|
Vinyl Windows Making It EasyVinyl windows in my opinion are the best things sense sliced bread. They not only make installation a breeze,with their nailing flange, but when properly installed they are air and water tight. This was not always true with the older style windows.
Over the course of the three homes I built, I have used several types of windows . The first house had wooden single hung windows with a single pane of glass. These windows required a storm window on the outside if you wanted to keep the drafts down to a minimum. On house number two, I installed horizontal sliders. These where reasonably priced windows at that time and had a double set of sliding glass ...no storm window required here. Well these windows were not completely air tight but the big problem was that condensation forming between the two sets of sliding glass would freeze and then you couldn't get the outside sliders open. Well I solved this problem twenty years later by replacing them with new vinyl windows.
When it came to house number three there was no question on what type of window I would be installing. The only decision was on the style and I decided on single hung windows with low-E glass and argon gas between the panes. If you are planning on building your own home and are going to install the windows yourself, then I strongly suggest vinyl windows.
Installing The WindowAs I had mention earlier, vinyl windows are a breeze to install . .The tools you will need to install the windows are : a level, hammer,nails,knife and sealing tape.
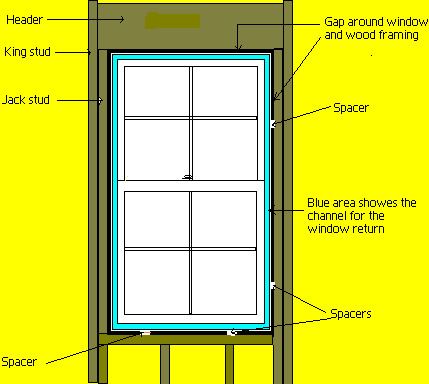
Although one person can do the job, as long as you can pick the window up and set them in place, two people will make the job easier. If you are installing windows on the second floor level or installing a larger window than you can handle by yourself,than this would be a good time to invite a few friends over. When rough framing window opening , the opening is made 1/2” to 3/4” larger than the actual size of the window. This allows room for leveling or plumbing the window. After the house wrap has been put on, the windows can be installed. The house wrap should be cut at the window openings so it can be stapled to the sides of the openings,covering the exposed window framing. The first step in installing the window is to place the window in the opening adjusting it so it is centered in the opening. Spacers placed at the bottom and on one side of the opening will aide in this task.
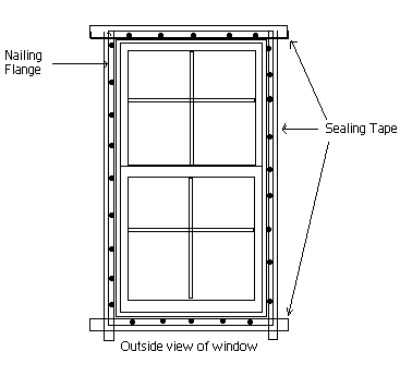
The next step is to level the sill of the window. When satisfied the window is level and centered , the window can be nailed in place by nailing through the nailing flange ,starting at the corners first. A 1 1/2” vinyl siding nail ,works great for this purpose.
The last step is to seal the window and this is done with a sealing tape. The tape is applied starting at the bottom then the sides and lastly the top. This will insure that any water will shed off. The tape should cover the heads of the nails and the edge of the window. I like to place a bead of caulking around the edge of the window opening before setting the window. Some people look at this as totally unnecessary,because you are sealing it with tape anyway, but I look at it as a second line of defense to keeping out the weather. It also helps to hold the window in place until it is nailed securely. The gap between the vinyl window and the framing will have to be insulated and what ever you use to do this job, care must be taken not to pack it to tight. If packed to tight it could put pressure on the window and cause the moving parts of the window not to move freely, not to mention reducing the R value of the insulation. If you use an expandable foam insulation for this purpose,make sure it is a low expandable type. Fill the cavity about 1/3 full and after letting it set for a few hours, you can add more if necessary. Excess foam can be trimmed with a utility knife,after the foam has set.
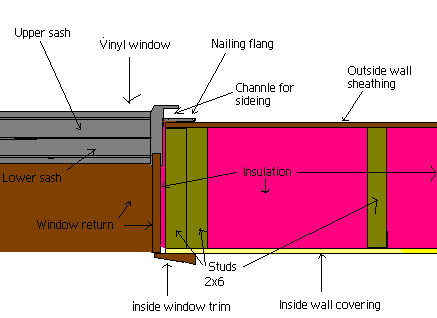
The illustration below shows detail of the inside finish of the window.
As shown in the illustration, the vinyl window has a channel that will except a window return. Some people use a wood or wood product for this return and some return the drywall to the channel. If the drywall is used as a return then the window trim is not used.
Return from Vinyl Windows to Windows and Doors
|


