


|
Roofing Your HomeRoofing requires a couple of decision to be made, before the job of protecting you home from the weather, can begin. The first decision...what type of roof and second are you going to do the job yourself. 
There is a lot to be said for doing the job yourself. But if heights are a problem or if your back is not up to the strain then maybe you should consider hiring a contractor . On the other hand if you have a strong back and heights are not a problem then go for it. The procedure is relatively easy and the satisfaction of doing the job yourself is well worth the effort. What to use? Well,this list can be quite long but you can bring the list down to a more reasonable size if you pick the ones that fall into your budget. However this is one area where it does not pay to sacrifice quality for price. If you plan on living in your home for a long time,the little extra you pay now will not compare to the cost of replacing the shingles 10 or 15 years from now.
I will mention three of the more popular types of materials that would fall into the average budget (or at least my budget). They are: Three tab shingles Architectural Shingles Metal Shingles / sheet metal
Three Tab Shingles have been around for a long time probably for 70 or 80 years. They are made from paper and asphalt with the exposed area of the shingle treated with granulated colored minerals. They come in different grades and colors. Grades are rated as 15 year, 20 year, 25 year etc. In recent years this shingle is being replaced with a shingle made of asphalt and fiberglass or other organic materials. They are sometimes refereed to as 3 in 1 because of the shingle having three tabs on one shingle giving the appearance of three shingles.
This diagram shows how to prepare a roof for installing 3 tab shingles. The first step is to nail drip edge around the perimeter of the roof . Next a strip of ice and water shield is applied to the bottom edge. This is a rubber type of material with a adhesive on the back side that adheres to the roof. A 15 lb. felt is then applied by starting at the ice and water shield and overlapping it by 4in. The remaining rows of paper are overlapped also. The next step is to apply a row of starter shingles to the bottom edge. A 18in. wide 45 lb felt, or similar product, can be used for this.
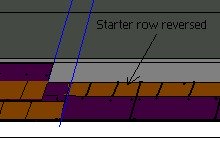
Another option would be to reverse a row of 3 tab shingles so the tabs are up and the top edge of the shingle is along the drip edge. The diagram on the right shows how this is done. On the far right of the drawing the 3 tab shingles can be seen applied with the tabs reversed. On the left of the drawing it shows two rows of shingles applied over the starter row.
The ridge cap is the finishing touch to keeping the rain and snow out of your home. Before the ridge cap can be applied the tabs need to be cut from the three tab shingles. These are cut as shown in the diagram below. 
A knife with a hooked blade works great for this job or any where else a shingle needs to be cut. Both ends of the shingle needs to be trimmed so they are straight across. Starting at one end, the tab is place over the ridge and nailed with two nails . The next tab is aligned over the previous tab and nailed. This procedure is repeated for the rest of the ridge. By snapping a chalk line along the ridge,this will insure that the ridge cap will be straight. If ridge vents are used, then these must be put in place before the ridge cap is installed. A note here on venting. Venting in the attic is necessary to insure a continues air flow from the saw-fit into the attic and out the vents. This keeps the attic cooler in the summer,and prolongs the life of the shingles,but also reduces the moisture in the attic. Ridge vents or gable end vents are used for this purpose.
For more roofing options follow the links belowGo to Architectural Shingles
|

 The diagram on the left shows the ridge cap installed on the roof and over a ridge vent.