Roof Layout And A Method for Marking Rafters
Roof layout requires a number of steps; laying out and cutting rafters is one. There are a number of methods to accomplish marking and cutting out rafters. I will attempt to describe the method I find that works the best for me.
First, we will need a framing square, pencil and a measuring tape. Next, we will need to know a few details before we can proceed with our roof layout.

We will use the details of the illustration above for this explanation.
Here is what we need to know:
1) How wide is the building ? According to the illustration the width is 28 ft.
2) What is the rafter run? The rafter run is half the width of the building (28 divided by 2= 14 ).
3) What is the pitch of the roof going to be? Illustration shows a 6'' in 12'' pitch.
4) What will the length of the rafter be? This is where our framing square first comes into play.
Pick up your square holding the tongue (the small arm of the square) in your right hand so the body ( the large arm of the square) is horizontal across the top. If you look at the body of the square you will notice 6 rows with a series of numbers, extending the length of the body.
The row that we are interested in is the top row. It is marked on the left side of the row with this description “ LENGTH COMMON RAFTERS PER FOOT RUN”.
Since we know our pitch is a 6'' in 12'', look along the top edge of the square at the 6'' mark. Just under the 6'' mark in the first row ,you will see 13.42. What this means is that for every foot of rafter run the rafter will be 13.42 inches long. So if we look back at # 2, we see the rafter run was 14'. And 14x13.42=187.88''
The run length of the rafter will be 187.88'', less half the thickness of the ridge board.
To express .88 as a fraction in 8ths, multiply .88 x 8=7.04 or 7/8''.You can drop the .04 because it represents .04 of 1/8 of an inch. Personally, my pencils are just not that sharp.
The run length expressed in inches would be 187 7/8''.
Now that we have all the information that we need, lets lay out our rafter.
Check the rafter material and take note of the crown. The crown will be the top edge of your rafter.

This illustration shows an exaggerated crown to get my point across. If your lumber is this bad then I would suggest taking it back and finding a new supplier of materials for your roof layout.

We will mark the top of the rafter first.This is the end that will be nailed to the ridge board.
Place the square on the rafter material as shown in illustration (A). Position the square so the 6'' mark on the tongue and the 12'' mark on the body align with the top edge of the rafter material. Mark this angle.

Measure from this mark (top edge of material) a distance of 187 7/8''and put a mark. Place the square as before, aligning the 6'' mark of the tongue and 12'' mark of the body, with the top edge of the rafter material. Align the back edge of the tongue with the 187 7/8'' mark. Draw a line down the edge of the tongue, as shown in illustration (B)of the roof layout.

Marking the birdsmouth and the ridge board setback.
Measure up a distance equal to 25% of the width of the rafter, as shown in illustration (C) and put a mark.
Flip the square over and place the tongue along the line made in illustration (B). Align the bottom of the body with the 25% mark and mark as shown.
To mark the ridge board setback go to your first mark (illustration A) and place a parallel line equal to ½ the thickness of the ridge board, as shown in illustration (C)of the roof layout.
Cancel the first line by drawing a line through it so as not to be confused by the two lines when cutting out the rafter.
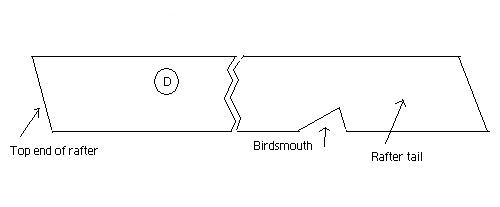
Illustration (D) shows what the rafter should look like when it is cut out.
When cutting out the rafter, care should be taken that the cuts are as accurate as possible. Always use the same rafter as a pattern to cut remaining rafters.
You have two options when cutting the rafter tails: you can cut them at the time of cutting the rafter or after they are in place. When possible, I prefer the latter, which entails snapping a chalk line across the tops of the rafters, plumbing a line down and then cutting the tails. This will ensure a straight alignment of the rafter tails for your roof layout.
For more information on roof framing
follow the links below.
Return From Roof Layout To Truss Construction
Return from Roof Layout to Roof Framing
Return from Roof Loyout to Steps To Building A Home
Go to Home Page


