The How to of Interior Wall Framing
Interior wall framing is not as complicated as it may appear. With a little basic know how you're well on your way to building a master piece.
The first step is to know the names of the parts that are used in the construction of an interior wall framing.

This diagram shows the framing components of a typical interior wall.
 The picture on the left shows a blueprint and the lay out of two bedrooms with closets ,a three piece bath and a hallway.
When tackling any project, one must look at the over all picture first.
My first step would be to strap the ceiling first.( 1x4 boards placed at 16" on center to fasten the drywall too.)
The next thing to consider is whether the bath is a one piece or not. If it is a one piece, it would be best to have it in place so you can frame around it. You may not get it in after the interior wall framing is completed.
And tearing down walls after they have been built..well..needs a lot to be desired.
Ok, I think we are ready to begin our interior wall framing.
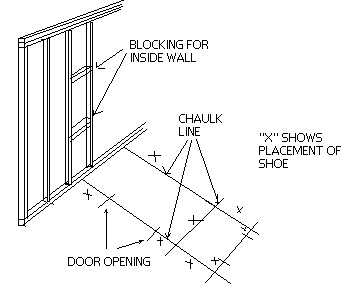
With a caulk line and a measuring tape indicate on the floor where the walls will go.( See the drawing on the right.) There is no need to mark both sides of the wall, but place a "x" on the side of the line where the wall will go.
Next mark in were the doors will be. Rough door openings are 2" larger than the door size. A 32" door would be framed in at 34", this will allow enough room to place a pre-hung door and make it plumb.
Cut 3 pieces of 2x4 (this is the dimension usually used for inside partitions) to the length of the wall you are building. Lay 2 of the pieces side by side and mark one "shoe" and the other one "plate".
The other piece will be used for the second plate.
 The drawing on the left shows how to mark the stud locations on the shoe and top plate.
Following the method in the above diagram, mark the stud location on the shoe and the plate.
Studs are placed at 16" on center, this allows for the proper placement of 4x8 sheets of drywall or paneling.
You will notice that the first measurement is 15¼","the rest of the measurements will be 16".
With a square, draw a line across both shoe and plate and place a "x" ahead of the mark, this is the location of the studs.
Mark the locations of the remaining studs by placing the tongue of the framing square at the first mark and draw a line across both pieces, always marking the "x" ahead of the line. Repeat this process for each stud location.
Now assuming your studs are the length as the ones you used on the outside walls , you are ready to start building your wall.
If they are not the right length,.. no problem.. just cut them to the proper length.

Laying out the studs and nailing them together for interior wall framing.
Lay out the shoe and plate as shown in the illustration and nail the studs in place using 3½" nails. Make sure the studs are placed on the side of the line marked with a "x".
When the studs are all in place the second plate can be nailed over the first plate.
 All that remains is to stand the wall,plumb and fasten it in place.
Where wood meets wood, nails will work great for securing the wall in place.
If you are securing to a concrete floor, concrete nails are the answer. If the concrete floor has heating pipes or wires then care must be taken not to puncher a pipe or a wire.
One method used to fasten the shoe to a concrete floor is to use a construction adhesive. This method works quite well
Before standing the wall in place, cut a length of vapor barrier 12"to 14" wide and the length of the wall and place it over the top plate. A few staples will hold it in place.
When installing the vapor barrier on the ceiling it can be taped to this strips, creating a continues sheet of vapor barrier.
Return from Interior Wall Framing to Steps to Building a Home
Go to Home page


