The Framing Stage Of Your
New Home Construction
Up to this point all your hard work on your new home construction ....and there has been a lot of hard work .....has not had much of a showing.
You started your home building project in a hole in the ground and although you have had many exhausting days, you are just now getting your head above ground.
Well this is where things change..this is where a day's work makes a big difference.This is where your new home starts to take shape.
This is the framing stage of your new home construction .
If new home construction is new to you then there are a few terms..(framing lingo).. you should be familiar with .
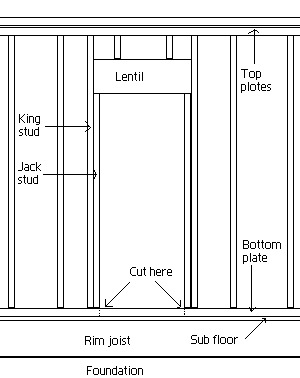
The picture below shows the components of the wall frame.

Studs are the vertical members of the wall frame to which the interior and exterior sheathings are fastened to.
Studs are fastened to the bottom and top plates which in turn supports the upper floor, ceiling and roof loads.
The length of studs will determine the height of the ceiling.
Studs are normally 2”x4” or 2”x6” and the latter being more common for exterior walls.The wider stud allows more space for insulation. 2”x4” are more common for interior partitions,although are still u some cases for exterior wall framing.
The spacing of studs are normally 16” on center but 2”e spaced at 24” oc. Some 2”x4” load bearing walls are often spaced at 12” oc.
As shown in the picture above, there are other names for studs depending on where and what they are used for.
A king stud when married with a jack stud form the support for the lintel and the cripple studs are the shorter studs cut to fit under the sill that forms the opening of a window.

Lintels are the top horizontal members of the wall framing. These are placed over windows,doors and other openings to carry vertical loads to the king and jack studs.
Lentils are made up of two pieces of 2” thick lumber and separated with spacers to a thickness equal to the width of the stud and are nailed together to form a solid piece.
The depth of the lentil is determined by the width of the opening and the load it must support... and this is set down by the building code for new home construction.
Sills are set in place to determine opening size and in the case of a window, they perform part of the support system.
Plates have two purposes: 1). to support the studs in a vertical position and 2). to distribute loads.
The top double plates transfer loads from ceiling,upper floor and roof to the studs and in turn to the bottom plate where it is then transferred to the foundation,through the floor framing.
There are two methods of building and erecting wall framing.
One method is to nail the bottom plate to the floor first and mark the location where the studs will be placed on the bottom and the first top plate.
The next step is to nail the studs to the top plate using 3 1/2” nails driven through the top plate into the top of the stud.
The top plates are cut so they meet half way on a stud.
Once a short section of wall is built, it is raised in a vertical position on top of the bottom plate and nailed to the plate by driving nails on an angle(toe nailing)through the side of the stud.
Temporary bracing is applied to hold the wall section in place.
The other method is much the same, the difference being,the bottom plates are nailed to the studs and after the wall sections are raised they are then nailed to the floor.
If using this method of new home construction...you can add the exterior wall sheathing and vapor barrier before the walls are raised.
Keep in mind to build a section of wall that can be handled by the help you have available. A 2”x6” wall with sheathing applied becomes quite heavy...8' sections are a good place to start.

Here is a illustration that shows how to mark a plate for a door or window opening.
If the top and bottom plates are laid side by side, the marks on one plate can be transferred to the other.

The illustration on the right shows how to frame a window opening .
Take notice this method is not the same as the way the window was framed in the new home construction picture, near the top of this page.
The method in this illustration is the one I prefer. It takes less framing material and leaves more space for insulation.
Lentil and sill are cut to the same length and the jack studs are cut to the rough opening dimension.
Although a single sill is all that is required,a double sill makes for better nailing when putting on interior window trim.
Most window manufactures specify rough opening(RO) dimensions.
Their dimensions will allow room for making the window plumb and room for insulation around the frame.
This method makes for a less complicated way to frame a window opening.
A door opening is framed in the same way, but without the sill. The jack studs run the full length of the door opening.
The bottom plate can be cut out between the jack studs to complete the door opening.
Before nailing the wall sections to each other ,at the corners... make sure the corners are plumb.
Temporary braces(1x4 strapping) placed on the inside of the wall and running diagonally from top corner plate to bottom plate and both ways of the corners, will hold them in place ensuring your new home construction is plumb and square.
If exterior 4x8 sheathing was applied before standing the wall sections the walls should be square and making sure the walls are plumb, should be all that is necessary.
Once the outside and any inside load bearing walls are up, the top plate can be nailed in place, aligning with the plate beneath it.

Joints should be spaced a minimum of 4' apart.

The plates overlap in the corners. and where inside load bearing walls meet outside walls as shown in the illustration.

This method of fastening an inside partition to an outside wall allows insulation to be placed behind the blocking.
Two by four blocking are cut to fit between the two studs of the outside wall.The blocking are placed on their flat and spaced at 24" apart and flush with the inside wall.
The partition wall is fastened to these blocks.
This method eliminates two studs being used.


This is the method I used to frame my corners.
This method allows for easy placement of insulation deep into the corners of your new home construction.

When the top plates are in place the walls can be straightened.
This can be done by placing a chalk line from corner to corner at the top of the wall. A block of wood is placed under the line at each corner and a block of equal size is used to determine if the wall needs to be moved toward the line or away from the line.
Temporary braces are used to keep the wall straight.
Return from New Home Construction to Steps to Building A Home
Return to Home Page from New Home Construction


